|
![]() |
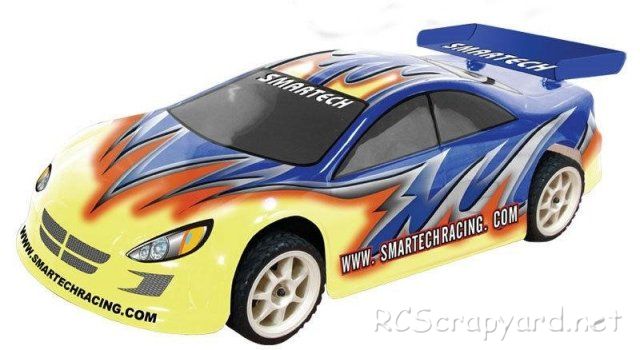
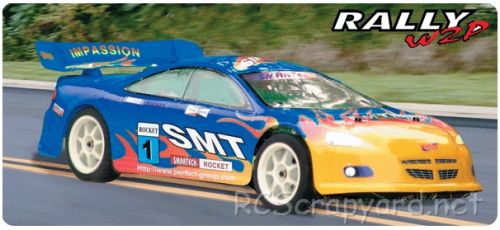
1/10 Scale Electric Rally/Touring Car:Smartech Rally W2P # 102430 / # 102431 (Radio Controlled Model)Navigation: Sitemap > Manufacturers > Smartech All Manufacturers: Model Types > On Road > 1/10 Electric On Road History, Info (and How To Set-up Tips) for the Smartech Rally W2P:Introduced by Smartech Racing circa 2002, the 4WD Rally W2P Car - # 102430 - came with a 540 motor and - # 102431 - with a brushless motor.
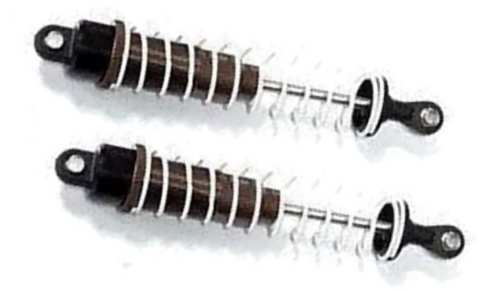
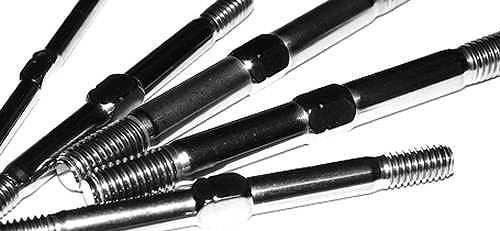
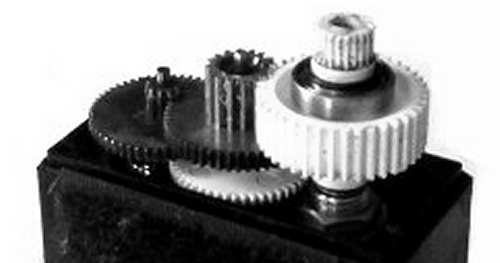
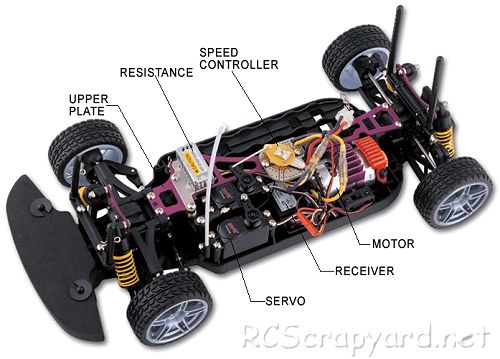
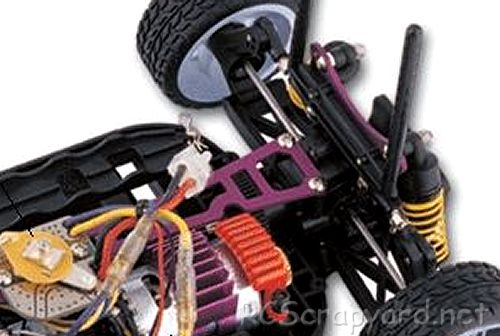
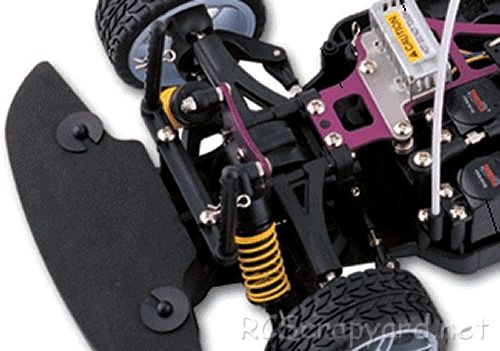
 The model was shaft driven on a molded plastic chassis, with gear type differentials, coil spring over oil filled dampers, dogbone drive-shafts and ball bearings. ![]() To race the Smartech Rally W2P, it calls for fine tuning to attain better steering response and improve grip when cornering so you don't slide off the side of the track. Minute changes can make huge advancements. Our easy to understand list will show you how and lead you to the optimum Set-up to put you in front of the rest on the track. We give you all the basic information you need to guide you to the best Electric Motor for your Rally W2P and achieve the best Gearing, to get you in front on the track and keep you there. Find out how the worlds top professional RC racers get improved efficiency from their Bearings employing a number of sensible ideas. Find the way to avoid Radio interference, and basic instruction on how to Charge your Batteries, so they will last longer and provide improved power. |
![]() ![]() ![]() ![]() ![]() ![]() ![]() ![]() |
|
![]() ★ Smartech Rally W2P ★![]() ★ Smartech Rally W2P Chassis ★![]() ★ Smartech Rally W2P Chassis ★![]() ★ Smartech Rally W2P Chassis ★![]() |
Buying a Used Smartech Rally W2P |
Manufacturers and Brands Catalogued and Listed by RC-Scrapyard.At present, the RC Model Manufacturers, Brands and Distributors covered by us are: ABC Hobby, Academy, Acme Racing, Agama Racing, Amewi, Ansmann Racing, ARRMA, Team Associated, Atomic RC, Axial, AYK, Bolink, BSD Racing, Capricorn, Carisma, Carson, Caster Racing, Cen, Corally, Custom Works, Durango, Duratrax, ECX - Electrix, Exceed RC, FG Modellsport, FS-Racing, FTX, Fujimi, Gmade, GS-Racing, Harm, HBX, Helion, Heng Long, Himoto Racing, Hirobo, Hitari, Hobao, Hong-Nor, Hot Bodies, HPI, HSP, Intech, Integy, Jamara, JQ Products, Kawada, Kyosho, Losi, LRP, Maisto, Mardave, Marui, Maverick, MCD Racing, Megatech, Mugen, New Bright, Nichimo, Nikko, Nkok, Ofna, Pro-Pulse, Protech, PTI, RC4WD, Redcat Racing, RJ-Speed, Robitronic, Schumacher, Seben, Serpent, Smartech, Sportwerks, Step-Up, Tamiya, Team-C Racing, Team Magic, Thunder Tiger, Tomy, Top Racing, Traxxas, Trinity, Tyco, Vaterra RC, Venom, VRX Racing, WLToys, X-Factory, Xmods, Xpress, Xray, XTM, Yankee RC, Yokomo, ZD Racing and Zipzaps. This is an ongoing project, with new and "lost in time" RC Model Brands being added as they are found and although most of those listed above have been covered in relative detail, some are still being researched and will be completed in the near future. |
Hints and TipsKeeping NotesIf all you will ever do is go racing at your local track every week, then this article is not for you. However, if you ever look towards travelling around to different tracks around the country, or even the world, the value of keeping notes is all too obvious. Every time I raced in a regional or national competition meeting, I would make detailed notes, aided by a little local knowledge initially and later fine tuned to suit my own driving style. My experience now means there are few, if any outdoor tarmac tracks within a 300 mile radius I haven been to and my notes on motor, gearing, camber angles, shock settings, tire choice and what inserts work best for that particular track, amongst others, allow me to save valuable time on the finer points of car setup, that can be done in the warmth of my own home on the kitchen table days before the meeting, instead of the often crippling heat, or the arduous conditions inside a wind blown tent. There are lots of methods for making notes on setup. The easiest perhaps is to download the blank pages often supplied by your cars manufacturer with a line drawing of your car and spaces for you to fill in as to the setting you prefer. Great if each time you go to a particular track the conditions are always constant. Notes made on a cold windy day will be little use on a hot sunny days racing on the same track. Manufacturers setup pages for their top drivers can also be useful as a starting point, but you should never take that setup as being the best there could ever be. So, the first note you should make is of the weather conditions. The wind and its direction isn't really what I am talking about, although it can have an effect on your cars handling, it is not something you can change your setup to handle. Track temperature and humidity are the main things to note. Not the average for the day, but for each round of racing. And note what tires you used and how the car handled in each race. Detail everything that might be useful in the future, no matter how trivial. Note the motor used and the gearing. Check the temperature of the motor after the race, how much charge is left in the batteries. You may have won the race, but there is always room for improvement … your competitors will be doing just that. Every bit of information you compile will be useful for the next time you visit that particular venue. Weather forecasts these days are far more accurate than they used to be, so the adage "fore warned is fore armed" fits the bill. Simply search through your notes and find a day you raced with similar conditions to those forecast and set up your car to suit. But don't stop there. The conditions may be the same as they were when you made your notes, but that doesn't mean you can't improve your setup. Your practice laps will soon prove if your previous setup was correct, or give you a basis for more fine tuning. If you want to be the best, you have to work at it. Success doesn't come easy. You can be the best driver around, but if your setup isn't perfect you will never step up onto the winners rostrum. My motto … if you never try anything, you never do anything. And if you never do anything wrong, you aren't trying hard enough. |
Hints and TipsRide HeightTo allow the suspension on any RC model to do its work properly, it needs to settle in a position that is somewhere between it being able to react to any bumps and holes it may encounter on the track. To do this, it needs to be adjusted to somewhere in-between those limits. That position is termed the ride height and is generally measured with the car race ready, that means with the motor and battery etc installed and is the distance between the underside of the chassis and the ground. Simply speaking, determining ride height is dependent on the specific track conditions. For off road models the rule is simple, the bigger the bumps and the deeper the holes, the higher the ride height. On road, the closer the car is to the track, the better it will handle. For 1:10 Buggys I generally recommend a starting point for ride height at around 20mm. 1:10 Trucks and Truggys, 30mm upwards, depending on the wheel diameter. For On Road models, as low as possible, but normally the setting is around 5mm. Ride height doesn't just affect the way the car handles uneven track conditions, it also influences the way the car handles when cornering. For a stable car, body roll must be kept to a minimum and keeping the ride height low, is by far the best and easiest way to control it. Before you begin to set the ride height, it is best to make sure that each pair of shocks are exactly the same length, have the same spring type and same silicone oil weight. Also, if you don't have a ride height gauge of any kind, decide what height you want set your car to and prepare some kind of slip gauge to that dimension, a book, a pen, or anything that measures to what you want. I used an old square plastic servo mount, which was exactly 5mm for my touring car. It may be low tech, but it is just as accurate as any gauge you can buy. To set the ride height, the race ready car must be placed on a flat surface. Slide your slip gauge under the chassis and adjust the height by adding or removing tension to the damper springs. This is done on most models by using small C shaped clips, placed over the damper, above the springs, or on a number of top of the range models, this adjustment can be made by screwing a knurled nut on each threaded damper body. As a rule if the springs are compressed by more than 25% they should be replaced by stiffer springs. The gauge should just slide under the chassis on all four corners of the chassis. |
|
|