Radio Controlled Models
Share RCScrapyard on Facebook
RCScrapyard Radio Controlled Models
Flags
RCScrapyard.net contains Google AdSense Ads and Amazon Affiliate links, from which we may earn commission. See our Disclosure page for more information.
bar

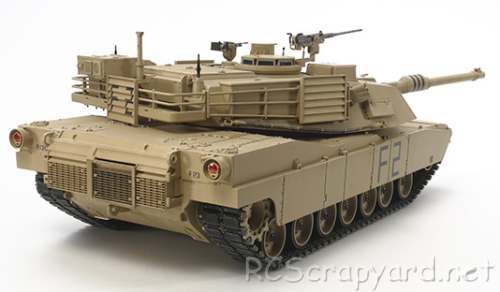
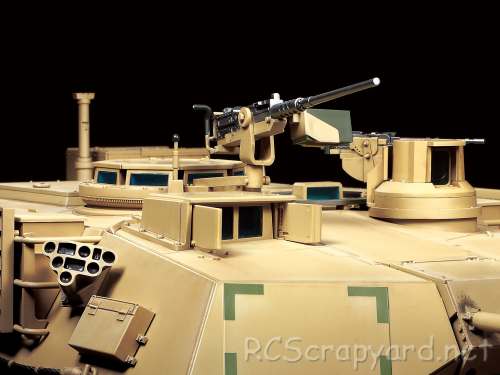
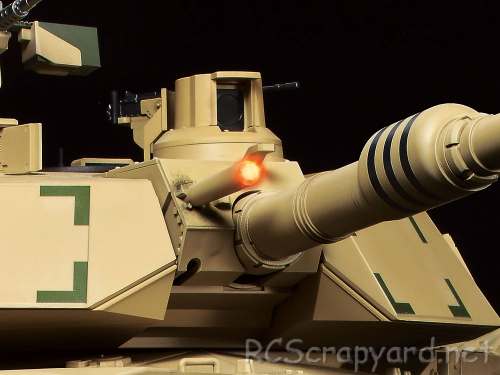
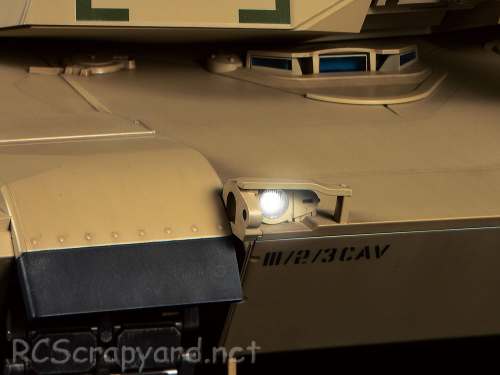
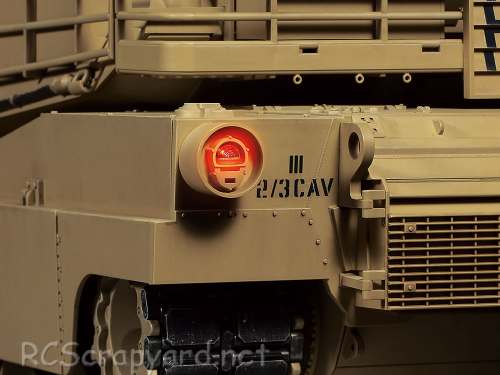
Tamiya US M1A2 Abrams - Full Option Kit - # 56041 (Radio Controlled Model Review)

1/16 Scale Electric Tank -

  Released by Tamiya on December 9, 2017, the US M1A2 Abrams Tank (#56041) is the Full Option Kit version.

  A front-mounted double gearbox, incorporating 3 gear type differentials, with two electric motors, operate together or individually to produce forward/reverse running and pivot turning. Metal torsion bars and suspension arms combine with the wide tracks to smoothly absorb bumps and dips in the terrain and provide high manoeuvrability. In addition, realistic engine sounds accompany the tank as it starts up, drives and stops to idle. The main gun can be elevated, depressed and swung to the left and right.

Tamiya US M1A2 Abrams - # 56041

▼ Scroll Down for More Images ▼


  The M1 Abrams was formally adopted in 1980 and features highly recognizable flat surfaces and angular form, plus a powerful gas turbine engine. It was designed to be upgrade friendly and various modifications throughout its service life have seen it remain at the cutting edge of military technology into the present day. One upgraded variant was the M1A1HA, which supported a 120mm smoothbore gun and depleted uranium armor on the turret and hull; the M1A2 evolved this design further with technological advancements such as the CITV thermal imaging sight, a Positive/Navigation System and integrated sights for the commander and the driver. Its IVIS system allows advanced communication and information sharing between friendly vehicles. The M1A2 appeared in 1992 and in 2003 it saw its first action, in operations in Iraq.

  The U.S. kit version includes 32 850-size ball bearings that replace the included brass bushings for the road wheels. Other country versions may come with metal bushings, that after a short while, when dust and grit get into them, can actually wear into the metal drive shafts that spin in them - we recommend these should be replaced by a full set of steel shielded ball bearings ASAP.


Rating: 44 Stars out of 5 RCScrapyard


Gas/Nitro Engines Body Shells Radio Transmitters etc Tires Wheels/Rims Electronic Speed Controllers Battery Packs / Chargers Electric Motors


Flags


Tamiya US M1A2 Abrams

Hints, Tips and Information

How to avoid Radio Interference

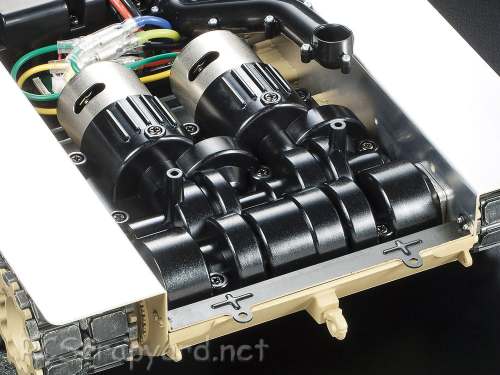
1/  The first consideration when installing your Receiver into your Electrically Powered Model is to make sure it is well away from the Negative Battery terminal, and the Motor. The Magnetic field can cause stuttering type interference at times of high current draw (i.e., Fast Acceleration)

2/  Make sure the Ariel tube is long enough for the Ariel wire. The tip of this wire is highly sensitive and should be as high, and as far away from the Motor as possible (yup, its that magnetic field prob again)

3/  If all else fails, a simple tip that often works for all RC Model enthusiasts is to wrap the receiver in Aluminium Foil, to shield against any magnetic and external radio interference.

Read the Complete Article  ▶ ▶


Tamiya Buggys Tamiya Trucks Tamiya Monster Trucks Tamiya Rock Crawlers Tamiya Off Road Chassis Types Tamiya Touring Car Tamiya Drift Car Tamiya WRC Car Tamiya M Chassis
Tamiya Tractor Trucks Tamiya Touring Car Chassis Tamiya F1 Tamiya F1/Le Mans Chassis Types Tamiya Military Tamiya Tanks


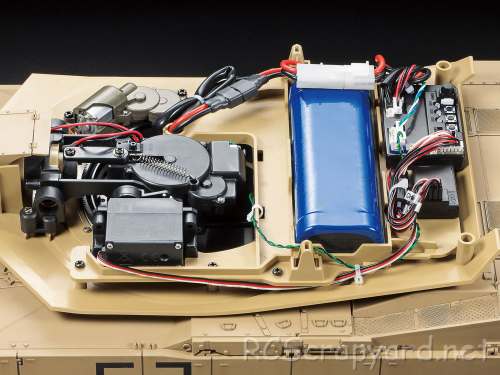
Hints, Tips and Information

Rechargeable Batteries
for RC Models

   At the time this article was written, there are four types of Rechargeable Batteries that are commonly in use for Radio Controlled Models.
Ni-Cad (Nickel Cadmium) Batteries have been around the longest. My first stick battery, purchased way back in 1987 was rated at 1200Mah (Mili Amp Hours) and with a silver can 27 Turn motor my Tamiya Boomerang would run around in the back yard for a good seven minutes before slowly coming to a stop. Ni-Cad development continued until around 1998 to a maximum rating of around 2000Mah and matchers pack builders and battery technicians were able to put together six cell packs with voltages approaching 7.4 Volts, to give those that could afford them, an edge over the rest.

   Ni-Mh (Nickel Metal Hydride) Batteries came along in the late 1990s, and by the year 2000 were available at ratings up to 3000Mah. Again, matchers and pack builders worked hard to provide the ardent racer with packs to provide that little bit of extra power, and ESC manufacturers also chipped in with improved controllers to take full advantage of this new technology.

   Now the problem wasn't gearing the car to get to the end of the race using the available battery power, but to find the brushed motor that could handle gear setting that provided the speed and acceleration without the motor overheating and wearing the commutator too much so it needed a skim after every 2 runs. My favourite at that time was the 9 Double.

   More recently, Li-Po (Lithium-Polymer) Batteries have appeared on the scene, providing are a huge step forward in performance when compared with Ni-Cad and Ni-Mh batteries.

Read the Complete Article  ▶ ▶


Hints, Tips and Information

Ride Height

   To allow the suspension on any RC model to do its work properly, it needs to ride in a position where it is able to react to any bumps and holes it may encounter on the track. Therefore, it needs to be adjusted to somewhere in-between those limits. That position is commonly termed "ground clearance" or "ride height" and is generally measured as the distance between the underside of the chassis and the ground, with the motor and battery etc installed.

   Simply speaking, determining the optimum ride height is dependent on the specific track conditions and "droop" setting (see my previous article). For Off Road models the rule is simple, the bigger the bumps and the deeper the holes, the higher the ride height. And for On Road, the lower the ride height, the better.

Read the Complete Article  ▶ ▶


^ TOP ^

RC Models:
Radio
& Motors:
Other
Accessories: